It is impossible to imagine a modern house or apartment without shelving, as they have become indispensable. They can be found in office premises and in trading floors. The rack is universal in its purpose, it can be found both in the living room or children's room, so in the bathroom, corridor, balcony, basement, garage. It all depends on his purpose and the style of your home.

Wooden shelving - features
The most common are wooden shelves of various designs and designs. The reasons for their features:
- can be a decoration of the room;
- save space well - relevant for small apartments;
- can be used when zoning the room;
- have a simple design - can be made independently;
- spacious - you can arrange a large number of books, children's toys, cosmetics and much more.
Do-it-yourself wooden shelving
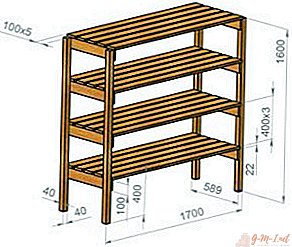
 In stores, you can buy racks and shelves of various designs, sizes, you can buy in parts as you receive finances, but if you summarize everything you get a pretty solid amount. If you look closely at the finished wooden shelves in the store, you will find that its dimensions do not match your room or the shelves are not deep enough, or the shelves are not strong enough to hold heavy items, or quite high, and the prices for shelves are quite high.Carefully looking at the rack, it turns out that there is nothing complicated in their design. Vertical bars are attached to horizontal, on which the shelves are located.
A self-made rack made of wood can be the pride of the master, if it has a beautiful appearance, fits well into the interior. After all, his master performs in his sketch, in the necessary sizes, in his unique design.
If you have basic knowledge of the school drawing course, you can draw and design a bookcase, or you can use ideas from specialized literature or the Internet, see a photo. There are numerous drawings and schemes for every taste. It remains only to choose.
Necessary materials
To make a rack with your own hands, you need to take care of the material. The main condition that must be strictly observed is a well-dried material to avoid mold damage, cracking and deformation. The material should be with a smooth outer layer, without distortion. Depending on the purpose of the rack, various materials are also used:
- plywood - for carved and small shelves;
- Fibreboard, particleboard and chipboard - a durable, easily bending material - therefore suitable for modular round and round shelves, designers are widely used for the original interior.
- embossed board (with knots, cracks of various shapes) - for shelves of unusual shape;
- wooden board of soft species: pine, larch, cedar, spruce, alder, linden, aspen - for inexperienced craftsmen.
REFERENCE. If the product is made of coniferous species, you need to remember about special processing so that the resin does not protrude.
Step-by-step instruction
As any business is carried out according to the instructions, for the manufacture of high-quality and beautiful shelving you need step-by-step instructions:
 determine the location of the future rack;
- take sizes;
- draw or pick up his sketch;
- draw a drawing according to the size of the selected place;
- calculate the amount of materials needed for the product - calculate the total cost;
- purchase the necessary materials;
- prepare tools;
- cut blanks;
- assemble the rack;
- to paint (with varnish, paint, stain, wax).
 determine the location of the future rack;
The rack is ready. It is only necessary that it dry out well and you can use it.
IMPORTANT. When choosing material in the store, pay attention and check for cracks, knots and straightness. Cracks worsen the look. Knots are a potential break point.
Varieties of wooden shelves
Wooden shelves can be made with your own hands, and they can be:
- simple;
- combined (modular);
- removable;
- standard;
- open
- closed - with sashes;
- non-standard.
Racks (shelves) can be classified by the method of fastening:
- mounted;
- outboard;
- stationary.
They are mounted on the wall, save space. Suitable for small apartments.
- floor racks (shelves) - are installed on the floor.
More at the location:
- angular - located in the corners, uses the angular space;
- built-in - are located in various niches.
Custom solutions
Shelves are very simple to manufacture, so very often masters apply various design techniques to them. Such shelves are beautiful, original:
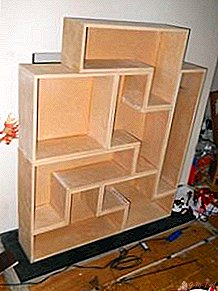
 Floor shelves - transformers. Very simple, compact and versatile, increase living spaces in apartments. They can easily acquire different forms, change their appearance, but continue to fulfill their main function;
- Mounted - honeycombs. Original and functional shelf made in the shape of a honeycomb;
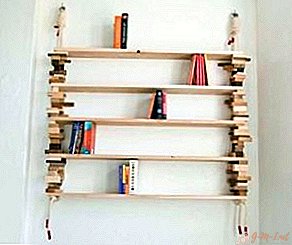
- Suspended - suspended from the wall using decorative ropes, chains, belts. In this case, the shelf also acts as a decorative element, decorates the room;
- Luminous - made of non-standard boards with cracks of various sizes, knots. It is well polished during manufacture, and cracks and irregularities are filled with polyester resin. It can also be a room decoration if various decorative elements are added to the resin: luminous paint, sparkles, colored stones and even LED lamps;
- Inverted shelf - both the upper surface and the lower are used. Attached with a furniture stapler, an elastic band of the right size and quantity, to the bottom surface, fixes the books.
 Floor shelves - transformers. Very simple, compact and versatile, increase living spaces in apartments. They can easily acquire different forms, change their appearance, but continue to fulfill their main function;
Carved shelves
Carved shelves can be either hinged, angular, standard, or modular (curly wall shelves decorated in antique style). They are decorated with various carvings; they can be an art object. Therefore, in addition to the main purpose, they are an interior decoration and preference is given to premises with a small area.
Carved shelves are easier to make from plywood. Using a jigsaw, it is easy to cut out a pattern from it; it turns out light, airy and delicate. They are internal and external, depending on what angle they are intended for. Any option is very original, it allows the productive use of corners. Their sizes depend on the expected load. For books and heavy souvenirs, a shelf of 25-30 mm wood is selected, without knots and cracks. Mounting methods also depend on the load. Brackets are considered the most reliable; loops are less reliable.
How to make a wooden shelf with your own hands
Shelves can be made in horizontal and vertical position. You can make them yourself if you can hold a hacksaw in your hands and know how to use a screwdriver. At the end of the work, you can enjoy the results of your work. Get another practical experience in furniture manufacturing.
Necessary materials and tools
A very interesting and functional modular shelf in the form of bee honeycombs. Modules are hexagonal. The shape depends on the number of modules. For its manufacture, you will need a standard set of tools and materials:
- hacksaw or jigsaw;
- screwdriver (screwdriver);
- construction level;
- roulette;
- screws, dowels;
- miter box;
- file;
- sandpaper;
- wooden plank;
- paint, varnish;
- brush;
- fixing loops.
Step-by-step instruction
Manufacturing steps:
- Sketch a future shelf.
 Make measurements of the place where it will be placed.
- Calculate the weight of items for placement - will help determine the choice of material.
- Make a drawing of the module indicating the size - will help to calculate the financial costs and volume of material.
- Purchase the necessary material and prepare tools.
- To process a board (to plan, polish, paint).
- Mark boards according to the size of the drawing.
- From the board to cut blanks in size.
- Saw the edges of the workpieces with a miter box, on both sides, at an angle of 300.
- Assemble modules with self-tapping screws and a screwdriver
- Assemble the modules according to the sketch - massive modules are interconnected by 3-4 self-tapping screws, for strength. For extra strength in the combs, partitions can be made.
- On the back of the shelf, fasten the hinges with screws. The number of fixation points will depend on the length of the shelf. The longer it is, the more mounting points.
- Drill holes for wall mounting on the wall or use wall plugs. The holes are made strictly horizontally using the building level.
- Place the finished structure on the wall.
 Make measurements of the place where it will be placed.
IMPORTANT. Shelves for heavy items should be made as reliable as possible, made of solid materials and of considerable thickness.
The work has ended and its result - an original, multifunctional and roomy bookcase for books and various beautiful objects. Quite durable, well fitting into the interior of the room and corresponding to its size. One can be proud of such a rack. A positive result can inspire the master to new and promising projects, possibly more complex ones.
Shelves and racks are excellent material for the flight of the creative imagination of the master, so modern shelves are not only a place to store various items, but also a wonderful decorative object that adorns the room and makes it convenient and cozy for life.

Leave Your Comment